Creating a New Map
This guide walks through everything needed to add a new map — open-world zone or instanced dungeon — to a MIP project.
Step 1 — Create the Level
Create a new level however you prefer (File → New Level, duplicate an existing one, etc.).
Once the level is open, go to World Settings and locate the GameMode Override field.
Set it based on the map type:
| Map type | GameMode Override |
|---|---|
| Open-world / town / field | BP_MIP_GM |
| Instanced dungeon | BP_MIP_SessionDungeon_GM |
Why does it matter?
BP_MIP_GM handles standard player connections and persistence.
BP_MIP_SessionDungeon_GM layers on session allocation, party syncing, dungeon-end conditions, and the fee/requirement gate checked before travel.
Step 2 — Add a Player Start
Players need a spawn point. MIP ships its own Player Start actor that integrates with the respawn and character-class systems.
- Open the Place Actors panel (
Shift+1orWindow → Place Actors). -
In the search field, type
mip def(or the full name MIP Default Player Start). The list shows MIPDefault Player Start — that is the same actor.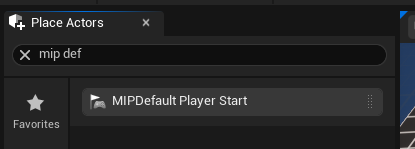
-
Drag MIPDefault Player Start into the level wherever you want the initial spawn location to be.
You can place multiple MIP Default Player Starts — the framework will choose among them using the standard Unreal player-start selection logic.
Step 3 — Register the Map in the Map Data Table
Every map the server can travel to must have a row in the DefaultMapDataDataTable configured in MIP Settings (Project Settings → ModularInventoryPlus → DataTables).
Add a new row (type FMIPMapData) for this level. The row name is used as the map identifier and referenced by FDataTableRowHandle throughout the system.
Step 4 — Dungeon-Only: Configure Entry Requirements
Skip this step for non-dungeon maps.
Open Project Settings → ModularInventoryPlus → DataTables | Map and find InteractionTagAndEnterDungeonInfoMap.
Each entry maps an Interaction Tag (the tag fired when the player interacts with a dungeon-entrance actor in the world, e.g. a portal) to an FMIPEnterDungeonInfo struct that defines who is allowed in and what it costs.
If the entry for your dungeon's tag is left empty (no FMIPEnterDungeonInfo row added), there is no fee and no requirement — anyone can enter. It is still recommended to set at least LevelRequirement to prevent under-leveled characters from entering.
FMIPEnterDungeonInfo Fields
| Field | Type | Description |
|---|---|---|
MapData |
FDataTableRowHandle |
Points to the FMIPMapData row for this dungeon. This tells the system which level to allocate and travel to. |
LevelRequirement |
int32 |
Minimum player level required to enter. 0 = no requirement. |
RequiredTags |
FGameplayTagContainer |
The player's tag container must include all of these tags. Use this to gate access behind quest completion, titles, access passes, or other flag-style conditions. |
ActionLimitRequirement |
FMIPActionLimitRequirement |
Ties entry to an Action Limit budget (e.g. "can enter this dungeon 10 times per day"). The ActionTag (ActionLimit.*) must be configured in the Action Limits system. Leave the tag empty to skip the limit check. |
Fee |
FMIPCurrencyFeeStruct |
Currency fee deducted on entry. See sub-table below. |
FMIPCurrencyFeeStruct (the Fee sub-struct)
A fee is only active when all three fields are filled in. IsValidFee() returns false if any field is missing, so a partially configured fee silently skips the charge.
| Field | Type | Description |
|---|---|---|
CurrencyTag |
FGameplayTag (Inventory.Currency.*) |
Which currency to charge (e.g. Inventory.Currency.Gold). |
StorageTag |
FGameplayTag (Storage.*) |
Which storage to deduct from (defaults to Storage.Personal.PlayerInventory). |
FeeAmount |
int64 |
Amount to deduct. Must be > 0 for the fee to be valid. |
Error types returned on failed entry
UMIPPlayerDungeonManager::CheckDungeonRequirementAndReturnError outputs one of:
EDungeonRequirementErrorType |
Cause |
|---|---|
NotEnoughFee |
Player doesn't have enough currency in the specified storage. |
LevelDoesnotMet |
Player level is below LevelRequirement. |
DoesNotHaveRequiredTags |
Player is missing one or more RequiredTags. |
ExceedLimit |
Player has exhausted the ActionLimitRequirement budget. |
Step 5 — Add Mob Spawn Triggers (Optional)
To populate the level with mobs, place Mob Spawn Triggers in the world. MIP provides a ready-made sphere-shaped trigger:
BP_MST_Sphere is a sphere collision actor — mobs inside its radius are managed by the attached spawner component. When no player is nearby the trigger deactivates its spawner to save performance.
Place one or more BP_MST_Sphere actors in the level and configure the spawner settings (mob data asset, count, respawn delay, etc.) on each one.
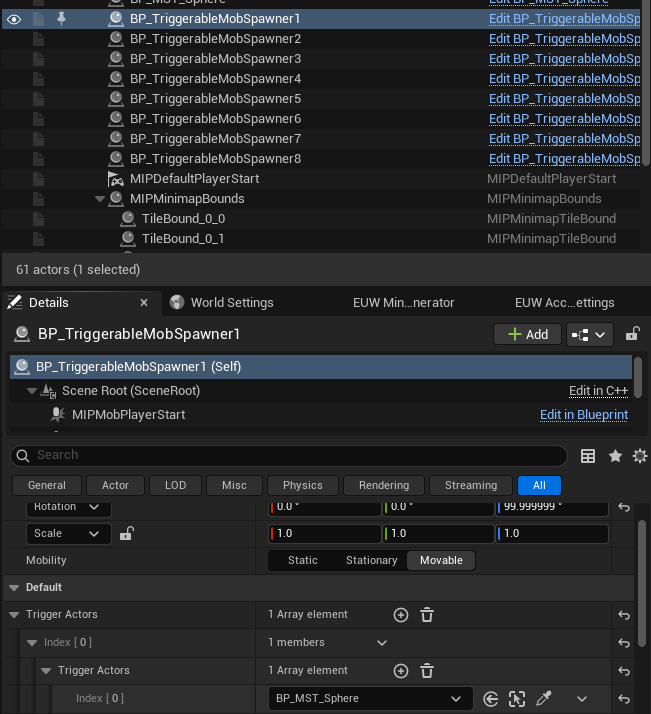
If your project uses triggerable mob spawners (for example BP_TriggerableMobSpawner), set Editables → Spawning Mob Class to the mob blueprint you want that spawner to spawn:

Trigger Actors controls what activates the spawner. To fire when the player enters a sphere trigger, add your BP_MST_Sphere actor to Trigger Actors (the editor uses a nested array — expand each index until you can pick the sphere from the level):
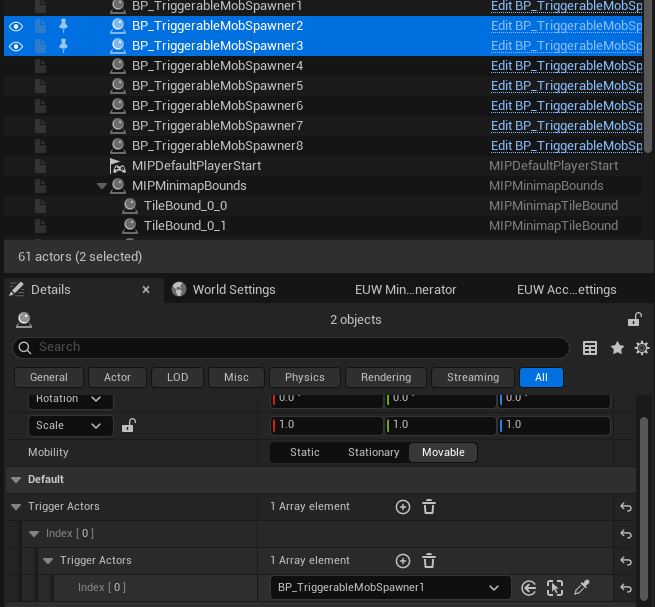
You can also chain spawners: set Trigger Actors to another spawner actor so the next wave starts when the previous spawner’s condition is met (for example, after it is cleared):
Spawner details
See Mobs & Spawners for full spawner configuration and loot override options.
Summary
| Step | Action |
|---|---|
| 1 | Create level → set GameMode Override (BP_MIP_GM or BP_MIP_SessionDungeon_GM) |
| 2 | Place MIPDefault Player Start from the Place Actors panel (search mip def) |
| 3 | Add an FMIPMapData row to DefaultMapDataDataTable |
| 4 | (Dungeons only) Add an entry to InteractionTagAndEnterDungeonInfoMap in MIP Settings |
| 5 | (Optional) Place BP_MST_Sphere mob spawn triggers |
See Also
| What | Link |
|---|---|
| Map data table structure | Settings & BPFL |
| Action Limits system | Action Limits |
| Mob spawner reference | Mobs & Spawners |
| Gate / portal actors | Gate |